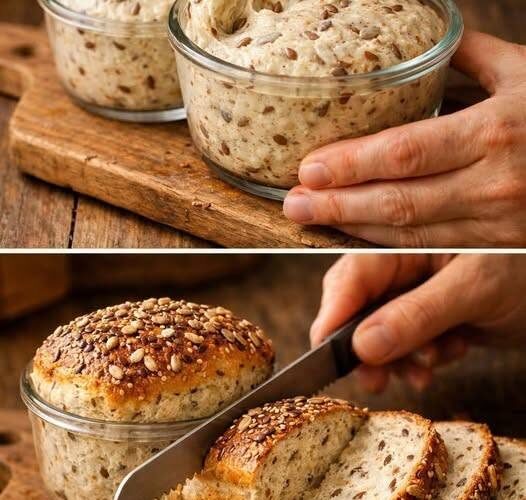
Seeded No-Knead Jar Bread – Recipe
Introduction
Seeded No-Knead Jar Bread is a rustic artisan-style loaf that’s wonderfully crisp on the outside, soft and airy on the inside, and packed with the wholesome crunch of nutritious seeds. Made with a simple no-knead dough that ferments slowly for incredible flavor, this bread is baked inside a heatproof jar or glass baking vessel, giving it a beautifully rounded shape, an evenly baked crumb, and an irresistibly crisp crust.
Unlike traditional bread recipes that require extensive kneading, this method relies on time rather than effort. During the long resting period, the dough naturally develops gluten, creating a light, chewy interior filled with beautiful air pockets. The addition of mixed seeds not only adds texture and flavor but also gives the bread a hearty, rustic appearance that looks as impressive as it tastes.
The gentle fermentation allows the flour to develop a deeper, more complex flavor while the enclosed baking environment traps steam, helping create the signature crackling crust found in artisan bakery loaves.
Whether you’re enjoying it fresh from the oven with butter, using it for gourmet sandwiches, serving it alongside homemade soups, or pairing it with cheese and charcuterie, this Seeded No-Knead Jar Bread is a versatile loaf that’s as beautiful as it is delicious.
A perfect Seeded No-Knead Jar Bread should deliver:
crispy artisan crust → soft airy crumb → nutty seeds → rich homemade flavor → satisfying chewy finish
Why You’ll Love This Recipe
This bread is:
- No kneading required
- Beginner-friendly
- Crispy on the outside
- Soft and airy inside
- Packed with wholesome seeds
- Made with simple pantry ingredients
- Perfect for sandwiches and toast
- Freezer-friendly
- Bakery-quality at home
- Full of rustic artisan flavor
- Great for meal prep
- Beautiful enough for entertaining
What Makes No-Knead Bread Special?
Traditional bread develops gluten through kneading.
No-knead bread develops gluten naturally through:
- Hydration
- Time
- Slow fermentation
As the dough rests, gluten strands form on their own, creating a strong structure that traps air bubbles and produces a beautifully open crumb with very little hands-on work.
Preparation Time
Prep Time
- 15 minutes
First Rise
- 12–18 hours
Second Rise
- 1 hour
Baking Time
- 40–45 minutes
Cooling Time
- 1 hour
Total Time
- Approximately 15–20 hours
Servings
- 10–12 slices
Ingredients
For the Dough
- 3½ cups (440g) bread flour
- 1½ teaspoons (5g) instant yeast
- 1½ teaspoons salt
- 1¾ cups (420ml) warm water
Seed Mix
- 2 tablespoons sunflower seeds
- 2 tablespoons pumpkin seeds
- 1 tablespoon flaxseeds
- 1 tablespoon sesame seeds
- 1 tablespoon chia seeds
Optional Topping
- Extra sesame seeds
- Extra sunflower seeds
- Rolled oats
- Poppy seeds
Ingredient Breakdown
Bread Flour
Bread flour provides:
- Strong gluten development
- Chewy texture
- Better rise
- Crisp crust
Its higher protein content makes it ideal for artisan bread.
Mixed Seeds
The seed blend adds:
- Crunch
- Nutty flavor
- Beautiful appearance
- Extra texture
Each seed contributes a unique taste and bite.
Yeast
Yeast creates:
- Rise
- Air pockets
- Flavor development
A small amount is all that’s needed thanks to the long fermentation.
Water
Water hydrates the flour and allows gluten to develop naturally.
A wetter dough helps create the open crumb that artisan bread is known for.
Equipment Needed
- Large mixing bowl
- Wooden spoon or spatula
- Clean kitchen towel or plastic wrap
- Heatproof glass jar or glass baking vessel with lid (or a Dutch oven if preferred)
- Parchment paper
- Cooling rack
Step 1: Mix the Dough
In a large bowl combine:
- Bread flour
- Instant yeast
- Salt
Stir well.
Add:
- Warm water
Mix until no dry flour remains.
The dough will look sticky and shaggy.
This is exactly how it should look.
Step 2: Add the Seeds
Fold in:
- Sunflower seeds
- Pumpkin seeds
- Flaxseeds
- Sesame seeds
- Chia seeds
Mix until evenly distributed.
Avoid overmixing.
Why Is the Dough So Sticky?
A high-hydration dough creates:
- Larger air pockets
- Softer crumb
- Crispier crust
Resist the temptation to add extra flour.
Step 3: First Rise
Cover the bowl with plastic wrap or a clean towel.
Leave at room temperature for:
12–18 hours
The dough should:
- Double in size
- Become bubbly
- Look airy
- Smell pleasantly yeasty
This slow fermentation develops exceptional flavor.
Step 4: Shape the Dough
Lightly flour your work surface.
Turn out the dough gently.
Using floured hands, fold the edges toward the center several times to form a loose round loaf.
Avoid pressing out the air bubbles.
Step 5: Second Rise
Place the shaped dough on parchment paper.
Cover loosely.
Let it rise for:
1 hour
Meanwhile, preheat your oven to:
450°F (230°C)
Place the empty heatproof jar or baking vessel (with its lid, if using) into the oven while it preheats.
Why Preheat the Baking Vessel?
A hot baking vessel:
- Creates instant steam
- Helps the dough rise quickly
- Produces a crisp artisan crust
- Encourages better oven spring
Always ensure your jar or glass baking vessel is specifically designed to withstand high oven temperatures to avoid breakage.
Step 6: Transfer the Dough
Carefully remove the hot baking vessel from the oven.
Using the parchment paper, lower the dough into the vessel.
Sprinkle with:
- Extra sesame seeds
- Sunflower seeds
- Oats
if desired.
Cover with the lid.
Step 7: Bake
Bake covered for:
30 minutes
Then remove the lid.
Continue baking for:
10–15 minutes
until:
- Deep golden brown
- Crisp crust
- Hollow sound when tapped
The internal temperature should reach about 200–205°F (93–96°C).
Step 8: Cool
Remove the bread from the baking vessel.
Transfer to a cooling rack.
Allow it to cool for:
1 hour
before slicing.
Why Cooling Is Important
As the bread cools:
- The crumb finishes setting.
- Moisture redistributes evenly.
- Slicing becomes cleaner.
Cutting too soon can make the interior gummy.
Texture Goals
Perfect Seeded No-Knead Jar Bread should have:
Crust
Golden, crisp, and crackly.
Interior
Soft, airy, and chewy.
Seeds
Crunchy and evenly distributed.
Overall Experience
Rustic, hearty, and satisfying.
Flavor Profile
First Bite
Crunchy toasted seeds.
Middle Notes
Chewy artisan bread.
Finish
Nutty, slightly earthy, and buttery when served warm.
Delicious Variations
Rosemary Seed Bread
Add:
- 1 tablespoon chopped fresh rosemary
to the dough.
Whole Wheat Version
Replace:
- 1 cup (125g) bread flour
with whole wheat flour.
Garlic Herb Bread
Mix in:
- 2 teaspoons garlic powder
- 1 teaspoon dried thyme
Cheese Seed Bread
Fold in:
- 1 cup (110g) shredded sharp cheddar
before the first rise.
Cranberry Walnut Bread
Add:
- ½ cup (60g) dried cranberries
- ½ cup (60g) chopped walnuts
for a lightly sweet variation.
Common Mistakes
Dense Bread
Cause
Adding too much flour.
Solution
Keep the dough sticky.
Flat Loaf
Cause
Old yeast or insufficient fermentation.
Solution
Use fresh yeast and allow the full rise time.
Pale Crust
Cause
Not baking long enough.
Solution
Bake until deeply golden.
Gummy Interior
Cause
Slicing while hot.
Solution
Cool completely before cutting.
Storage
Room Temperature
Store in a paper bag or bread box for:
- Up to 3 days
Refrigerator
Not recommended, as it can dry out the bread.
Freezer
Wrap tightly and freeze for:
- Up to 3 months
Thaw at room temperature before serving.
Serving Suggestions
Serve with:
- Salted butter
- Garlic herb butter
- Olive oil and balsamic vinegar
- Homemade soups
- Stews
- Cheese boards
- Avocado
- Smoked salmon
- Scrambled eggs
Perfect for:
- Breakfast
- Brunch
- Lunch
- Family dinners
- Holiday meals
- Sandwiches
- Rustic entertaining
Expert Tips
- Use bread flour for the best texture.
- Don’t rush the overnight fermentation.
- Handle the dough gently to preserve air bubbles.
- Preheat the baking vessel thoroughly.
- Let the bread cool completely before slicing.
- Toast leftover slices for extra crunch.
- Experiment with different seed combinations to create your own signature loaf.
Nutritional Information (Approximate Per Slice)
- Calories: 185
- Protein: 6g
- Carbohydrates: 31g
- Fat: 4g
- Fiber: 3g
- Sugar: 1g
Final Thoughts
Seeded No-Knead Jar Bread is proof that artisan-quality bread doesn’t require complicated techniques or hours of kneading. With its crisp golden crust, airy interior, and wholesome blend of crunchy seeds, this rustic loaf is as enjoyable to bake as it is to eat.
This recipe delivers:
- Crispy artisan crust
- Soft, airy crumb
- Nutty seed crunch
- Deep homemade flavor
- Simple no-knead preparation
- Beautiful bakery-style results
And most importantly:
Every slice combines a crackling golden crust, a light and chewy interior, toasted mixed seeds, and rich slow-fermented flavor into a rustic homemade loaf that is wholesome, hearty, comforting, satisfying, and absolutely delicious.
