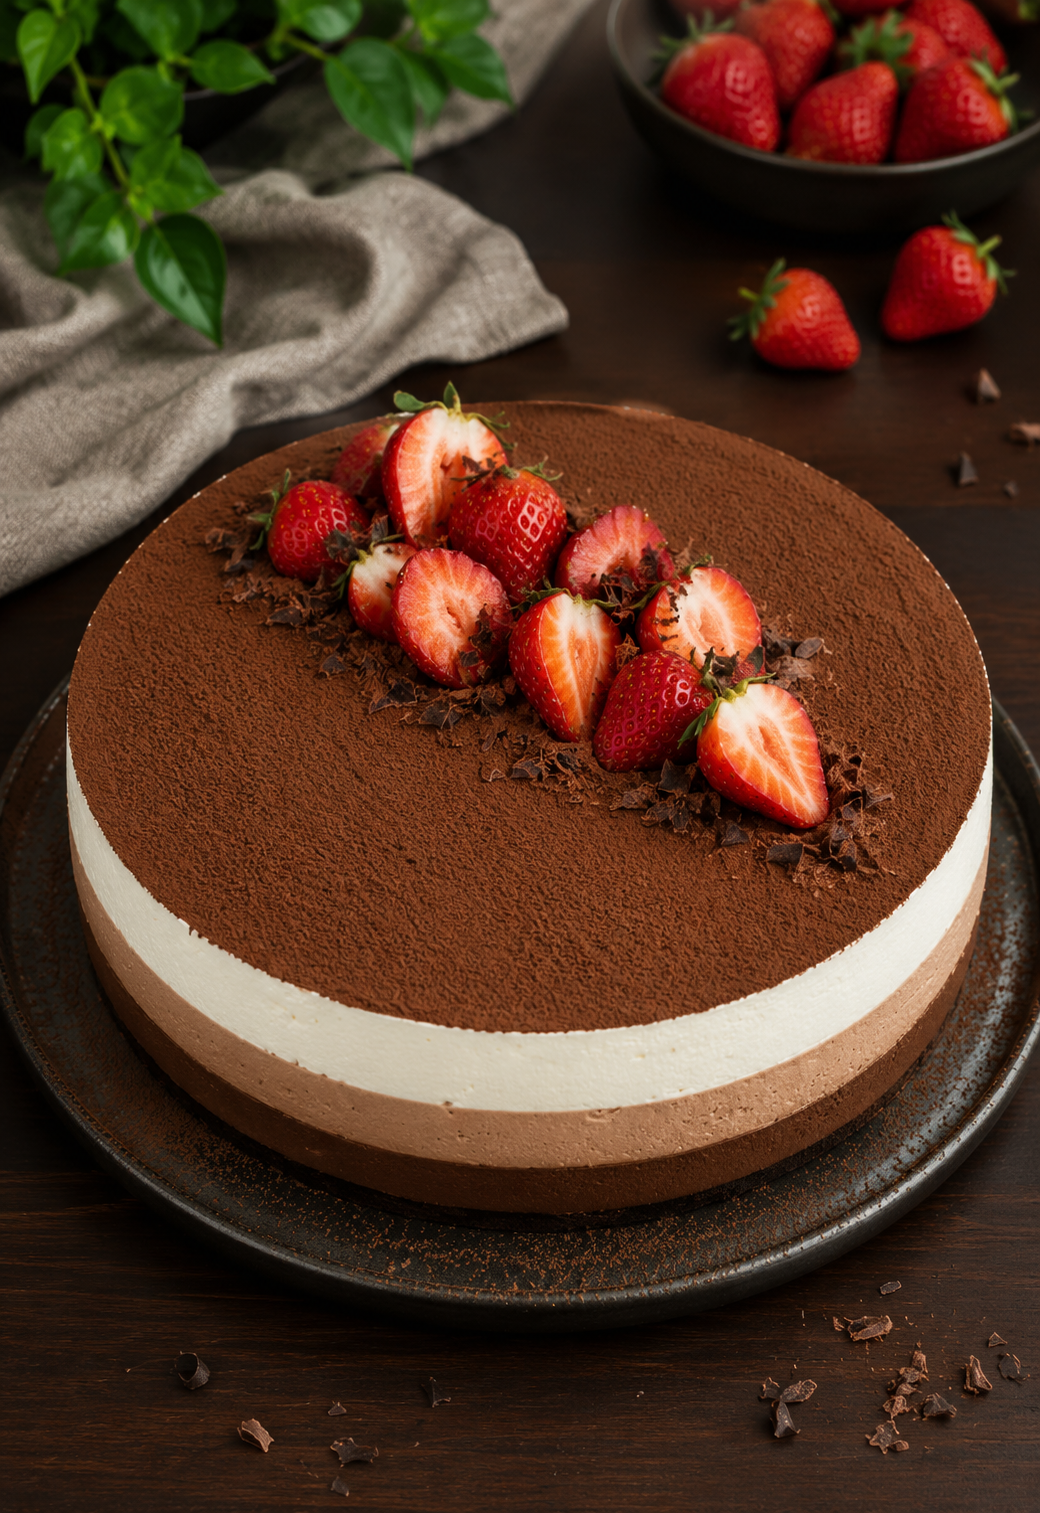
There are few desserts as impressive as a beautifully layered chocolate mousse cake. Combining rich chocolate flavor with a light, airy texture, this No-Bake Triple Chocolate Mousse Cake is a show-stopping dessert that looks elegant on any dessert table while requiring no oven for the mousse layers. Each bite offers a combination of crunchy cookie crust and three smooth chocolate mousses, creating a balanced dessert that’s both luxurious and satisfying.
This cake features three distinct layers made with dark chocolate, milk chocolate, and white chocolate. Every layer contributes its own unique flavor and texture, creating a gradual transition from rich and intense to light and delicately sweet. The result is a dessert that not only looks stunning when sliced but also delivers a variety of chocolate flavors in every forkful.
The foundation of the cake is a crisp Oreo cookie crust that provides a pleasant contrast to the creamy mousse layers above it. The buttery cookie base adds just enough texture to balance the soft, melt-in-your-mouth filling while helping support the delicate layers.
Unlike many celebration cakes that require multiple baking steps, this dessert relies on careful layering and chilling instead of baking. Although it needs several hours to fully set, the preparation itself is simple and straightforward, making it an excellent make-ahead dessert for birthdays, holidays, dinner parties, family gatherings, or any special occasion.
The finishing touch is a light dusting of cocoa powder and a handful of fresh strawberries or berries, adding both color and freshness to complement the richness of the chocolate. The contrast between the deep cocoa, creamy mousse, and vibrant fruit creates a dessert that’s as beautiful as it is delicious.
Whether prepared for a celebration or simply to satisfy a chocolate craving, this Triple Chocolate Mousse Cake is guaranteed to become a favorite for anyone who enjoys rich yet silky desserts.
Why This Recipe Works
Creating three separate mousse layers may sound complicated, but the process is much easier than it appears. Each layer follows the same simple method, making the recipe easy to prepare one step at a time.
Three Layers of Chocolate Flavor
- One of the highlights of this dessert is the gradual progression of chocolate flavors. Instead of overwhelming the palate with a single type of chocolate, each layer contributes its own character.
- The dark chocolate mousse offers a bold, slightly bittersweet flavor with a rich and velvety texture. Above it sits the milk chocolate mousse, which is creamier and sweeter, adding a familiar, comforting taste. The final layer of white chocolate mousse finishes the cake with delicate sweetness and an exceptionally light, airy texture that balances the richness beneath it.
- Together, these layers create a dessert that feels luxurious without becoming overly heavy.
No Oven Required
- Since the mousse layers are completely no-bake, there’s no need to heat the kitchen with extended baking times. Aside from melting the chocolate and preparing the crust, the refrigerator does most of the work by allowing each layer to firm up before the next one is added.
- This makes the recipe especially convenient during warmer months or whenever a simple yet elegant dessert is needed.
Beautiful Layers Every Time
- Allowing each mousse layer to chill briefly before adding the next helps create clean, distinct layers. Once sliced, the cake reveals beautiful stripes of dark, milk, and white chocolate, making it just as visually appealing as it is delicious.
- The smooth, even layers give the dessert a professional appearance without requiring advanced decorating skills.
Perfect for Special Occasions
- Because it can be prepared well in advance, this cake is ideal for entertaining. Preparing it the day before serving allows the mousse to fully set while giving plenty of time to focus on the rest of the meal or celebration.
- Its elegant presentation makes it suitable for birthdays, anniversaries, holiday dinners, family celebrations, or whenever a memorable dessert is needed.
Ingredients Overview
This recipe relies on a handful of quality ingredients that work together to create smooth, stable mousse layers with exceptional flavor.
Oreo Cookies
- The Oreo cookies form the crisp, chocolatey crust that supports the mousse layers. Once crushed into fine crumbs and mixed with melted butter, they create a firm base that contrasts beautifully with the creamy filling.
- If preferred, other types of cookies can also be used as an alternative crust while maintaining the same preparation method.
Butter
- Melted butter binds the cookie crumbs together, allowing the crust to hold its shape once chilled. It also adds richness and helps create a firm yet tender base for the cake.
Semi-Sweet Chocolate
- Semi-sweet chocolate is used for the first mousse layer. Its deeper chocolate flavor adds richness while balancing the sweetness of the layers above.
- Using good-quality chocolate is especially important since chocolate is the main ingredient throughout the dessert. Better-quality chocolate melts more smoothly and produces a richer, cleaner flavor.
Milk Chocolate
- Milk chocolate creates the second mousse layer, offering a creamier texture and sweeter flavor than the dark chocolate layer.
- Its smooth, familiar taste creates a gentle transition between the rich base and the lighter white chocolate topping.
White Chocolate
- The final mousse layer is made with white chocolate, adding delicate sweetness and a silky finish to the dessert.
- Its pale color naturally creates a striking visual contrast against the darker chocolate layers below.
Whipping Cream
- Whipping cream provides the light, airy texture that makes each mousse layer so smooth.
- Part of the cream is heated with the chocolate to create a silky chocolate mixture, while the remaining cold cream is whipped until stiff peaks form before being folded into the cooled chocolate. This technique gives each mousse its signature lightness while maintaining enough structure for clean slices.
Gelatin
- Gelatin helps stabilize each mousse layer so the cake holds its shape once chilled.
- After blooming in cold water and dissolving completely, it blends into the melted chocolate mixture before being folded together with the whipped cream. This creates a mousse that remains creamy while being firm enough to support the layers stacked above it.
How to Make No-Bake Triple Chocolate Mousse Cake
Although the finished cake appears elegant and detailed, the preparation is surprisingly simple when broken down into individual steps. Each stage builds on the previous one, resulting in beautiful layers that come together into one impressive dessert.
The process begins with preparing the cookie crust, followed by making each chocolate mousse one layer at a time before allowing the finished cake to chill until fully set.
Step 1: Prepare the Oreo Cookie Crust
- Start by placing the Oreo cookies into the bowl of a food processor. Pulse until the cookies become fine, even crumbs with no large pieces remaining.
- Pour the melted butter over the crushed cookies and continue processing until every crumb is evenly coated and the mixture resembles damp sand. The butter helps bind the crumbs together, allowing the crust to hold its shape after chilling.
- Lightly grease an 8-inch (20 cm) springform pan before transferring the cookie mixture into the bottom of the pan.
- Using the back of a spoon or the flat bottom of a measuring cup, press the crumbs firmly and evenly across the base. Taking a few extra moments to compact the crust creates a stable foundation that supports the delicate mousse layers later.
- Once the crust is evenly pressed into place, transfer the pan to the refrigerator while preparing the first chocolate mousse layer. Chilling the crust allows it to firm up, making it easier to spread the mousse without disturbing the cookie base.
Step 2: Prepare the Dark Chocolate Mousse
- Place the semi-sweet chocolate and ½ cup (120 g) whipping cream in a heatproof bowl over gently simmering water. Stir until the chocolate is fully melted and smooth.
- Meanwhile, bloom the gelatin in cold water for 5–10 minutes. Heat gently until dissolved, then stir it into the melted chocolate mixture. Let the mixture cool completely to room temperature.
- Whip the remaining ⅔ cup (160 g) cold whipping cream until stiff peaks form. Gently fold the whipped cream into the cooled chocolate mixture until smooth and evenly combined.
- Spread the dark chocolate mousse evenly over the chilled Oreo crust, smoothing the top with a spatula. Refrigerate for 15–20 minutes, or until slightly set before adding the next mousse layer.
Step 3: Prepare the Milk Chocolate Mousse
- Once the dark chocolate layer has chilled, prepare the milk chocolate mousse using the same method.
- Melt the milk chocolate with ½ cup (120 g) whipping cream over gently simmering water until smooth. Bloom the gelatin in cold water for 5–10 minutes, dissolve it over low heat, then stir it into the melted chocolate. Let the mixture cool completely.
- Whip the remaining ⅔ cup (160 g) cold whipping cream to stiff peaks, then gently fold it into the cooled chocolate mixture until smooth.
- Spread the milk chocolate mousse evenly over the chilled dark chocolate layer, smoothing the surface gently. Refrigerate for another 15–20 minutes, or until slightly set before adding the final layer.
Step 4: Prepare the White Chocolate Mousse
- For the final layer, melt the white chocolate with ½ cup (120 g) whipping cream over gently simmering water until smooth. Bloom the gelatin in cold water for 5–10 minutes, dissolve it over low heat, then stir it into the chocolate mixture. Let it cool completely.
- Whip the remaining ⅔ cup (160 g) cold whipping cream to stiff peaks, then gently fold it into the cooled white chocolate mixture until smooth and airy.
- Spread the white chocolate mousse evenly over the chilled milk chocolate layer, smoothing the top carefully for a neat finish.
Step 5: Chill the Cake
- Once all three mousse layers have been assembled, the cake needs sufficient time to fully set.
- Transfer the springform pan to the refrigerator and chill for at least 4 hours.
- For the best texture and the cleanest slices, allowing the cake to chill overnight is highly recommended. The additional time allows each mousse layer to firm up properly while the flavors develop and blend together.
- Resist the temptation to remove the cake from the pan too early. A fully chilled mousse cake slices much more cleanly and maintains its beautiful layered appearance.
Choosing the Best Chocolate
- Since chocolate is the star ingredient in this dessert, selecting high-quality chocolate makes a noticeable difference in both flavor and texture.
- Good-quality chocolate melts more smoothly, creates a silkier mousse, and delivers a richer chocolate taste throughout each layer.
- Because the recipe features three different types of chocolate, each one contributes its own character to the finished dessert. The dark chocolate adds richness, the milk chocolate provides creamy sweetness, and the white chocolate offers a delicate finish that balances the stronger flavors beneath it.
- Using quality chocolate allows each layer to stand out while creating a harmonious blend from the first bite to the last.
Alternative Crust Ideas
- Although the Oreo cookie crust pairs wonderfully with the chocolate mousse, there are several other options for the base if a different flavor or texture is preferred.
- Different varieties of cookies can be used to create a similar crumb crust while following the same preparation method.
- For those who don’t mind a little baking, the mousse can also be layered over a flourless chocolate cake or a rich brownie instead of a cookie crust. Both options create a delicious chocolate foundation while adding a slightly denser texture beneath the airy mousse.
- Regardless of which base is chosen, allowing it to cool completely before adding the mousse layers helps ensure the finished cake holds its shape properly.
Decorating the Cake
- Once the cake is fully chilled and set, remove it from the springform pan. Dust the top lightly with cocoa powder for an elegant finish.
- Decorate with fresh strawberries or your favorite berries for a pop of color and freshness. For clean slices, wipe the knife between each cut. The simple decoration lets the beautiful triple chocolate layers remain the star of the dessert.
Tips for Success
- Use good-quality chocolate: It melts more smoothly and gives the mousse a richer flavor and creamier texture.
- Cool the chocolate mixture: Let it reach room temperature before folding in the whipped cream to keep the mousse light and airy.
- Fold gently: Use slow folding motions to preserve the whipped cream’s volume.
- Chill between layers: Refrigerate each layer for 15–20 minutes before adding the next to keep the layers neat and distinct.
- Allow enough chilling time: Chill for at least 4 hours, or overnight for the best texture and clean slices.
- Press the crust firmly: A well-packed crust creates a sturdy base that holds together when sliced.
Serving Suggestions
- This No-Bake Triple Chocolate Mousse Cake is rich enough to stand on its own, making it an impressive dessert for almost any occasion.
- Serve each slice well chilled so the mousse maintains its smooth, creamy texture. The combination of the crunchy Oreo crust and the three distinct chocolate layers creates a dessert that’s satisfying without feeling overly heavy.
- The cake is an excellent choice for birthdays, dinner parties, holiday celebrations, family gatherings, or special occasions where an elegant dessert is needed.
- For a simple presentation, serve each slice with a few fresh strawberries or mixed berries alongside it. The fresh fruit adds a refreshing contrast that complements the richness of the chocolate.
- Because the dessert can be prepared in advance, it’s also a convenient option for entertaining. Preparing it the day before serving allows more time to focus on the rest of the meal while ensuring the cake is perfectly set.
Storage
- Proper storage helps maintain the cake’s texture and freshness.
- Cover the cake or store it in an airtight container in the refrigerator until ready to serve. Keeping it chilled helps preserve the structure of the mousse layers while maintaining their smooth consistency.
- If serving over several days, return any leftover cake to the refrigerator promptly after slicing.
No-Bake Triple Chocolate Mousse Cake
This triple chocolate mousse cake is an irresistibly rich and indulgent dessert that’s sure to impress from the very first bite. Featuring three light, creamy layers of chocolate mousse stacked over a crisp Oreo cookie crust, every slice delivers the perfect balance of smooth texture and deep chocolate flavor, making it impossible to resist.
12
servings1
hour10
minutes1
hour10
minutesIngredients
- Oreo Crust
7 oz (200g) oreo cookies
4 tbsp (60g) butter , melted
- Dark Chocolate Mousse
5 oz (150g) semi-sweet chocolate
1/2 cup (120g) whipping cream
2/3 cup (160g) whipping cream (35% fat) , chilled
1 tsp (4g) gelatin powder
1 tbsp + 1 tsp (20ml) cold water
- Milk Chocolate Mousse
5 oz (150g) milk chocolate
1/2 cup (120g) whipping cream
2/3 cup (160g) whipping cream (35% fat) , chilled
1 tsp (4g) gelatin powder
1 tbsp + 1 tsp (20ml) cold water
- White Chocolate Mousse
5 oz (150g) white chocolate
1/2 cup (120g) whipping cream
2/3 cup (160g) whipping cream (35% fat) , chilled
1 tsp (4g) gelatin powder
1 tbsp + 1 tsp (20ml) cold water
- For decorating (optional)
Cocoa Powder
Fresh Berries
Directions
- Prepare the crust.
- Add the Oreo cookies to the bowl of a food processor and blend until they become fine crumbs. Pour in the melted butter and pulse again until the crumbs are evenly coated and resemble wet sand.
- Transfer the crumb mixture to a lightly greased 8-inch (20 cm) springform pan. Press it firmly and evenly across the bottom using the back of a spoon or the bottom of a measuring cup. Place the pan in the refrigerator while you prepare the first chocolate mousse layer.
- Prepare the Chocolate Mousse Layers
- Place the semi-sweet chocolate and 1/2 cup (120g) whipping cream in a heatproof bowl. Set the bowl over a saucepan of gently simmering water, making sure the bottom of the bowl does not touch the water. Stir occasionally until the chocolate has completely melted and the mixture is smooth.
- While the chocolate is melting, sprinkle the gelatin over the cold water and let it stand for 5–10 minutes to bloom. Warm the bloomed gelatin over low heat just until fully dissolved, then stir it into the melted chocolate mixture. Leave the mixture to cool to room temperature.
- In a separate bowl, whip the remaining 2/3 cup (160g) chilled whipping cream until stiff peaks form. Gently fold the cooled chocolate mixture into the whipped cream until the mousse is smooth and evenly combined.
- Spread the semi-sweet chocolate mousse evenly over the prepared Oreo crust. Refrigerate for 15–20 minutes, or until the layer is slightly firm, while you prepare the next mousse layer.
- Follow the same process to make the milk chocolate mousse and white chocolate mousse, layering each one over the previous layer and chilling briefly between each addition.
- Once all three mousse layers have been assembled, refrigerate the cake for at least 4 hours, or preferably overnight, until fully set.
- When ready to serve, carefully run a thin knife around the inside edge of the pan before releasing the springform ring.
- Finish by lightly dusting the top with cocoa powder and garnish with fresh berries, if desired. Slice and serve chilled. Enjoy!
Nutrition Facts
12 servings per container
Serving Size1
- Amount Per ServingCalories509
- % Daily Value *
- Total Fat
39.4g
50%
- Saturated Fat 23.8g 115%
- Cholesterol 96mg 32%
- Total Carbohydrate
35g
13%
- Total Sugars 25.9g
- Protein 5.9g 10%
* The % Daily Value tells you how much a nutrient in a serving of food contributes to a daily diet. 2,000 calories a day is used for general nutrition advice.

