Chocolate Eclair Cake – Recipe
Introduction & Background
Chocolate Eclair Cake is a no-bake dessert that transforms a classic pastry concept into a layered, refrigerator-set creation that is both simple and deeply satisfying. Inspired by the traditional éclair—made from choux pastry filled with cream and topped with chocolate glaze—this version removes the complexity of baking and replaces it with a system of layering, hydration, and time-based transformation.
In its traditional form, an éclair requires precise pastry technique, careful piping, and oven control. This cake version eliminates all of that and instead builds the same flavor experience using everyday ingredients like biscuits or graham crackers, pudding, cream, and chocolate.
What makes this dessert unique is that it is not finished when assembled. It is a time-developed dessert, meaning the final texture and structure are achieved during the chilling phase rather than during preparation. The dry biscuit layers absorb moisture from the cream filling and gradually soften into a cake-like consistency.
This method creates a dessert that feels baked, even though no oven is used.
It is widely loved because it offers:
- Minimal effort with maximum reward
- Bakery-style flavor with simple ingredients
- Perfect make-ahead convenience
- A balanced combination of creamy, soft, and slightly firm textures
Chef’s Philosophy
This dessert operates on a simple but powerful principle:
Structure is created through controlled moisture absorption over time.
Instead of using heat to bind ingredients, this recipe uses:
- Moisture migration
- Cream stabilization
- Layer compression during chilling
Each component plays a role in this system:
- Crackers provide initial structure
- Cream provides moisture and softness
- Chocolate provides a sealing top layer
The goal is to achieve a final dessert where no individual layer feels separate. Everything should merge into a single, cohesive slice.
Difficulty, Timing & Yield
Difficulty Level: Easy
Preparation Time: 25–30 minutes
Chilling Time: 8–12 hours (overnight strongly recommended)
Total Time: ~9–12 hours
Servings: 8–12 portions
Ingredients (Detailed Functional Breakdown)
Layer Structure Base
- 2–3 packs graham crackers or plain tea biscuits
Function:
- Provide the framework for layers
- Absorb moisture during chilling
- Transform into soft, cake-like texture
The quality and thickness of the crackers affect final softness.
Cream Filling System
- 2 cups cold milk
- 1 packet instant vanilla pudding mix
- 1 to 1.5 cups whipped cream or whipped topping
Function:
- Acts as the primary moisture source
- Creates soft, creamy layers
- Provides sweetness and body
This filling mimics the interior cream of a traditional éclair.
Chocolate Topping System
- 1/2 cup cocoa powder or melted chocolate chips
- 1/2 cup milk or cream
- 2–4 tablespoons sugar
- 1–2 tablespoons butter
Function:
- Creates a rich top layer
- Seals moisture inside the dessert
- Adds contrast in flavor and texture
The topping should be smooth and spreadable, not overly thick.
Optional Enhancements
- Vanilla extract (for deeper flavor)
- Coffee powder (enhances chocolate flavor)
- Cream cheese (for tangy richness)
- Chocolate chips between layers
Step-by-Step Method (Highly Detailed Process)
Step 1: Preparing the Cream Filling
In a large bowl, add:
- Cold milk
- Instant pudding mix
Whisk thoroughly for 2–3 minutes until it begins to thicken.
Once thickened, gently fold in whipped cream.
Do not overmix. The goal is to maintain a light, airy texture.
Final consistency should be:
- Smooth
- Thick but spreadable
- Light and creamy
This mixture is the key to the dessert’s softness.
Step 2: Preparing the Dish
Choose a rectangular or square dish.
Ensure it is deep enough to hold multiple layers.
No greasing is required.
Step 3: First Layer Formation
Arrange graham crackers or biscuits in a single layer at the bottom.
Make sure:
- There are no large gaps
- Pieces are fitted tightly
Break crackers if necessary to fill edges.
This layer acts as the base foundation.
Step 4: First Cream Layer
Spread a generous portion of the cream mixture over the crackers.
Ensure:
- Even coverage
- Smooth surface
- No dry spots
This layer begins the hydration process.
Step 5: Repeating the Layers
Repeat the process:
- Crackers
- Cream
- Crackers
- Cream
Continue building layers until all ingredients are used.
The top layer should always be cream.
Each layer contributes to final structure and texture.
Step 6: Preparing the Chocolate Topping
In a saucepan, combine:
- Cocoa powder or chocolate
- Milk or cream
- Sugar
- Butter
Heat on low, stirring continuously until:
- Smooth
- Glossy
- Fully combined
Do not overheat.
Let the mixture cool slightly before applying.
Step 7: Applying the Chocolate Layer
Pour the chocolate mixture over the top.
Spread evenly using a spatula.
Ensure full coverage.
This layer acts as:
- A flavor cap
- A moisture seal
- A visual finish
Step 8: Chilling & Transformation Phase
Place the dessert in the refrigerator.
Chill for at least 8 hours, preferably overnight.
During this time:
- Crackers absorb moisture and soften
- Cream stabilizes into firm layers
- Chocolate sets into a smooth top
This stage is where the dessert becomes a cake.
Step 9: Final Serving Preparation
Once fully chilled:
- Slice into squares or rectangles
- Use a sharp knife for clean cuts
The texture should be:
- Soft but structured
- Creamy yet stable
- Easy to slice
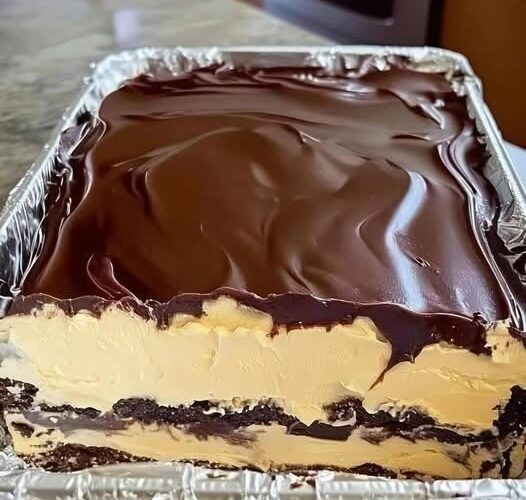
Texture & Flavor Analysis
A properly made Chocolate Eclair Cake delivers:
- Soft, cake-like layers from hydrated crackers
- Smooth and creamy filling
- Rich chocolate topping with slight firmness
- Balanced sweetness without heaviness
Every bite should feel unified, not layered separately.
Advanced Tips for Perfection
- Chill overnight for best results
- Use full-fat milk for richer texture
- Spread layers evenly for consistent slices
- Do not rush the chilling process
- Allow chocolate topping to cool slightly before pouring
Common Mistakes & Solutions
Dry or Hard Layers
Cause:
Insufficient cream or short chilling time
Solution:
Add more filling and chill longer
Runny Texture
Cause:
Pudding not fully set or too much liquid
Solution:
Whisk properly and measure ingredients accurately
Cracking Chocolate Top
Cause:
Topping too thick or cold when applied
Solution:
Apply slightly warm topping
Uneven Layers
Cause:
Improper spreading
Solution:
Take time to level each layer
Storage & Shelf Life
- Refrigerate up to 4 days
- Keep covered to prevent drying
- Best texture on day 2
- Not suitable for freezing
Serving Variations
This dessert can be customized easily:
- Add fruit layers (banana or berries)
- Use chocolate pudding instead of vanilla
- Add caramel drizzle
- Include crushed nuts for texture
Final Thoughts
Chocolate Eclair Cake is a perfect example of how technique and time can replace complexity in dessert making.
It transforms basic ingredients into a refined, layered dessert through:
- Moisture absorption
- Texture evolution
- Flavor integration
The result is:
- A soft, cake-like structure
- Creamy, rich filling
- Smooth chocolate finish
- Effortless preparation with impressive results
It is a dessert that proves you do not need an oven to create something that feels complete, indulgent, and professionally crafted.
